
How to Break in a Saxophone Reed
If you’ve played on cane reeds for any length of time, you know how frustrating they can be. Sometimes they sound fantastic, and sometimes they just don’t work at all. Though reeds still frustrate me on a regular basis, I’ve attempted to be more thorough about my process of breaking them in so that they’re less hassle. So, I’ve got a few tips to share.
How do you break in a saxophone reed? Start by wetting the reed lightly, taking care not to soak it too much. Put the reed on your mouthpiece and use a light warmup for a few minutes consisting of long-tones and scales. Then, put the reed away for the day in a specialized reed case to prevent warping and maintain the proper humidity. Repeat for several days, playing on each reed a little bit longer each day.
I’ll describe the full process in detail, as well as offering some other optional tips to make sure that you get the most out of your reeds.
Preparation
First, I recommend that you break in several reeds at the same time. If you’d like, you can even break in a full box at the same time provided that you have the proper storage for them (more on this later). All of the reeds that you are breaking in at the same time should be opened from their packaging at the same time.
You may want to have some system which involves labelling the reeds. Many people mark the back of the reed either with a number, a date, or with some indicator of how the reed performs (whether it is soft, hard, bright, dark, difficult to articulate on, etc). Otherwise, it will be difficult to tell which reed is which.
If you opt to number the reeds, you might consider keeping a reed log noting how the reed performs, as well as information about the current temperature, weather, and humidity. Reeds perform differently depending on all these factors, so it may be useful to know in what context a reed performed well or poorly.
Finally, make sure that you are using a high-quality reed case which has at least two features:
- A surface which is either rigid or glass to prevent warping of reeds
- Humidity control
It is very important that you do not use the casing that the reed came in. These containers are meant to serve only as packaging to transport the reed. They do not control humidity, nor will they prevent the reed from warping in any way. A reed case may seem like a strange investment at first, but it will save you money in the long run.
An optional first step
The first step after opening the reeds is usually to soak them. If you would like, however, you can add one additional step before this which involves rubbing the bottom of the reed on either regular printer paper or extremely fine sandpaper.
The reason for this is to close the pores on the reed. Sometimes, you will notice that reeds often sound “spitty” when you play them, and that this only happens for specific reeds. This occurs because all the pores fill up with fluid, and it is no longer possible to eliminate the fluid after it is there.
The way to prevent this is to spend a minute or so rubbing the reed against paper or fine sandpaper when you are breaking it in. If it is already happening with a reed that you are currently using, then unfortunately there isn’t any solution that I know of.
There is also an alternative to this, which is to rub your thumb on the vamp (toward the grain, so as not to damage the tip), which may also close the pores. Personally, I haven’t tried this method too much myself, but I’ve known some people who claimed that it works.
Not everyone is fond of either of these methods. It’s possible that you might ultimately get a better sound if you leave the pores open. However, if your reeds are sounding spitty, then that is usually a worthwhile sacrifice to make.
My recommendation is this: if you notice your reeds sounding excessively spitty (and just sucking spit out of your mouthpiece isn’t helping for more than a few notes) then try one of these techniques. If you never notice a problem, you can probably just skip this.
What to do immediately after opening a new reed
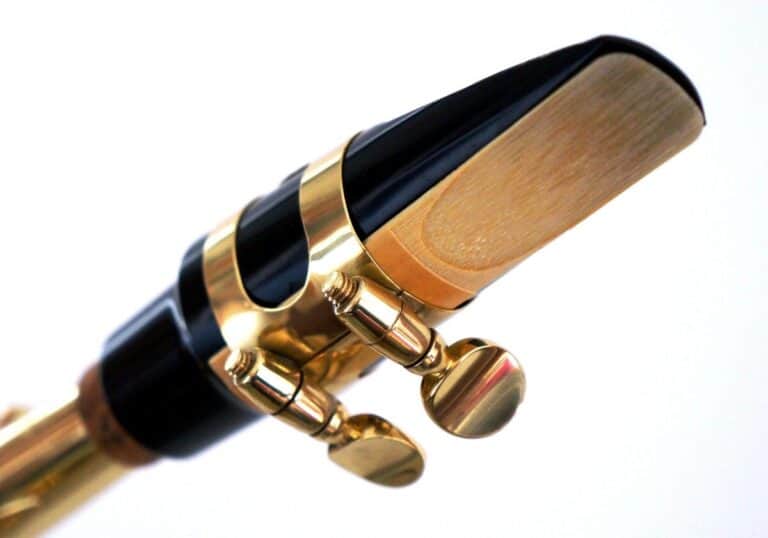
Start by lightly soaking them. You can do this with either water or saliva. I typically use saliva because it softens the reeds to some extent, and I tend to find that reeds more often run hard than soft.
Be careful not to soak them so much that they get waterlogged. You can tell that a reed is waterlogged when you can see through the tip of the reed to some extent. I will usually soak the back of the reed (known as the stock) in my mouth while just lightly wetting the vamp.
Then place the reed on the mouthpiece. You’ll want to do a warm up consisting mostly of long tones and a few scales in the lower range of the instrument. Keep the warm up simple; play at a somewhat softer volume, and don’t use any extended techniques such as altissimo or slap-tonguing. This warm up should give you a sense of how the reed plays.
After playing on the reed for about ten minutes or so, put the reed away in your designated reed case. If the reed starts to become waterlogged before this (tip is turning translucent, and/or reed is starting to feel soft) then you will want to put it away sooner.
What to pay attention to during the warm up
You will want to first notice whether the reed feels soft or hard. In general, if the reed feels too hard, you will want to move it lower on the mouthpiece. If it feels too soft, you will want to move it up on the mouthpiece. While this won’t fix a bad reed, it might make the reed a little bit more playable.
Also notice the tone color of the reed, as well as the ease of articulation. If the tone color is not to your liking or you are finding articulation to be difficult, modification of the reed may fix the issue to some extent. However, you will need to check the balance of the reed first in order to know where to make the modifications. This may be a good thing to check even on a working reed.
Checking the balance of the reed essentially determines whether one individual side of the reed is harder than the other. To do this, turn your instrument and mouthpiece to the left side without changing your embouchure or moving your head. This means that you are only playing on one side of the reed.
Continue to warm up, and notice the tendencies of the reed when you are only playing on one side of it. Then turn the instrument to the right side and go through the same process. Does one side of the reed feel more difficult than the other? If so, then the reed might be unbalanced.
You can correct an unbalanced reed to some extent through modification.
The continued process
In general, you will want to play on each reed that you are trying to break in a little bit each day. Until you’ve done this for several days, don’t use the reed for anything more than a light warm up.
On the first day, you should probably just play on the reed for a few minutes before putting it away. Doing any more than that might make the reed wear out more quickly. On the second day, you might consider playing the reed for 5-10 minutes, and possibly 15 minutes on the third day.
After you work yourself up to about 20-30 minutes of playing on a reed, I consider it broken in. That being said, this doesn’t mean you can just play on the reed constantly every time you practice.
If you practice several times per day, use a different reed for each session. If you can only practice once per day, try to use a different reed each day (or switch reeds in the middle of your practice if you are going for a longer duration). This will make your reeds last much longer.
Related Questions
How do I know if a reed is too hard? A reed which is too hard will feel stiff and difficult to produce a sound from. The sound that the instrument produces will sound far too weak for the amount of air that you are putting into it.
How long should I soak saxophone reeds? Typically, I recommend soaking the back of the reed in your mouth for about 20 seconds or so. Then lightly wet the tip of the reed for about one or two seconds.