How To Put a Reed on a Saxophone
One of the more nuanced steps of putting a saxophone together is placing the reed on the mouthpiece. If this is something that you have no idea how to do or something that you’re struggling with, we’ve got you covered.
To put your reed on your saxophone, you should place the reed onto the flat surface of the mouthpiece such that the tip and sides of the reed align with the edges of the mouthpiece. Then tighten the ligature around the mouthpiece just enough so that the reed does not move out of place.
My goal is to explain this process in as much detail as possible so that you can avoid the most common mistakes associated with reed placement.
Preparing to put your reed on
The first thing you’ll want to do is to make sure that your mouthpiece is on the cork of the neck, and that your ligature is on your mouthpiece. If you are using a cane reed (as opposed to a plastic one), you’ll want to make sure that it is sufficiently wet before putting it on the mouthpiece.
I’ll briefly walk through these steps. If you are already familiar with them and just want to learn about putting the reed on, feel free to skip ahead to the next section (titled “Putting the reed on”).
Putting the mouthpiece on the cork
In your saxophone case you should find a curved tube of metal which is smaller than the body of the saxophone. This is called the neck. The neck should have a cork at the end of it, and this is where the mouthpiece should go.
You can get the mouthpiece on the cork by holding the mouthpiece by the sides and using a twisting motion.
Never push the mouthpiece onto the cork head-on. The mouthpiece is meant to be held from the sides, not the tip. If you push on the tip of the mouthpiece, it will break and be ruined forever. You can see below the right and wrong ways to put the mouthpiece on.

After putting the mouthpiece on the cork, simply make sure that the ligature is on the mouthpiece (screws typically go to the right).

If you encounter resistance
You can make it easier to put the mouthpiece on the neck by using cork grease. Cork grease comes in a small tube which looks like chapstick (but it is not chapstick and you should not use it as such).
Simply apply some cork grease to the cork, and use your fingers to rub it in. This should reduce the friction between the cork and the mouthpiece.

Removing the reed from its case and wetting it
Most reeds come in a case made of plastic or sometimes soft cardboard. Be sure to be gentle as you remove it from its case, as even a single chip in the tip of the reed can ruin it permanently.
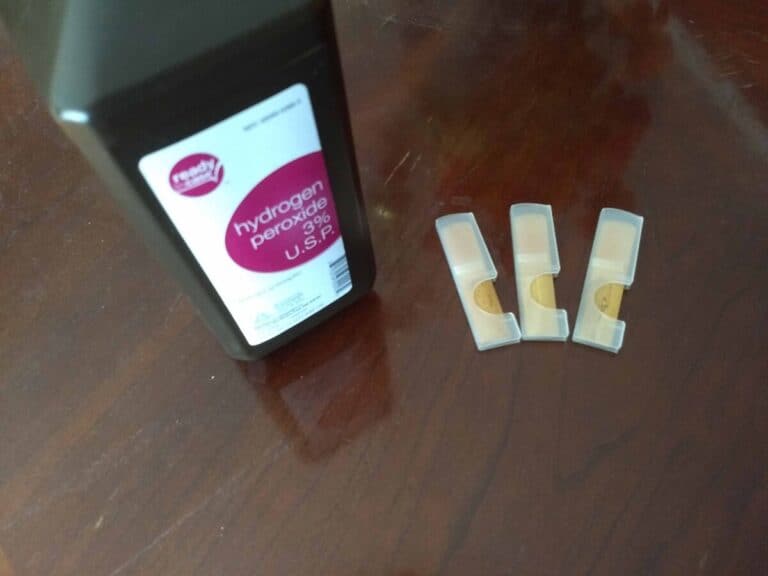
If you are using a reed made of cane, you should make sure that you wet it first. The easiest way to do this is with saliva, provided that you’ve brushed your teeth before playing (which you should always do, if possible). You can also use water, but I find saliva works better.
You don’t need to wet a plastic reed, but know that moisture will help it seal better with the mouthpiece.
Start by removing the reed from its case and putting the back of the reed into your mouth. The tip is fragile and can warp if it becomes waterlogged, so it is best to start wetting the reed from the back.
Once you’ve soaked the back of the reed in your mouth for about 30 seconds or so, lick both sides of the tip of the reed once or twice. This should get it wet enough to finally put the reed on the mouthpiece. You can see the process shown below:

Putting the reed on
This is probably what you came here for. Thankfully, this tends to be a relatively simple process once you’ve done it a few times.
Placing the reed under the ligature
Generally, best practice is to put the reed on after the ligature. The reason for this is that you otherwise risk chipping the reed with the ligature. It is easy to accidentally hit the fragile tip with the ligature, but this issue can be avoided if the ligature is already on the mouthpiece before putting the reed on.
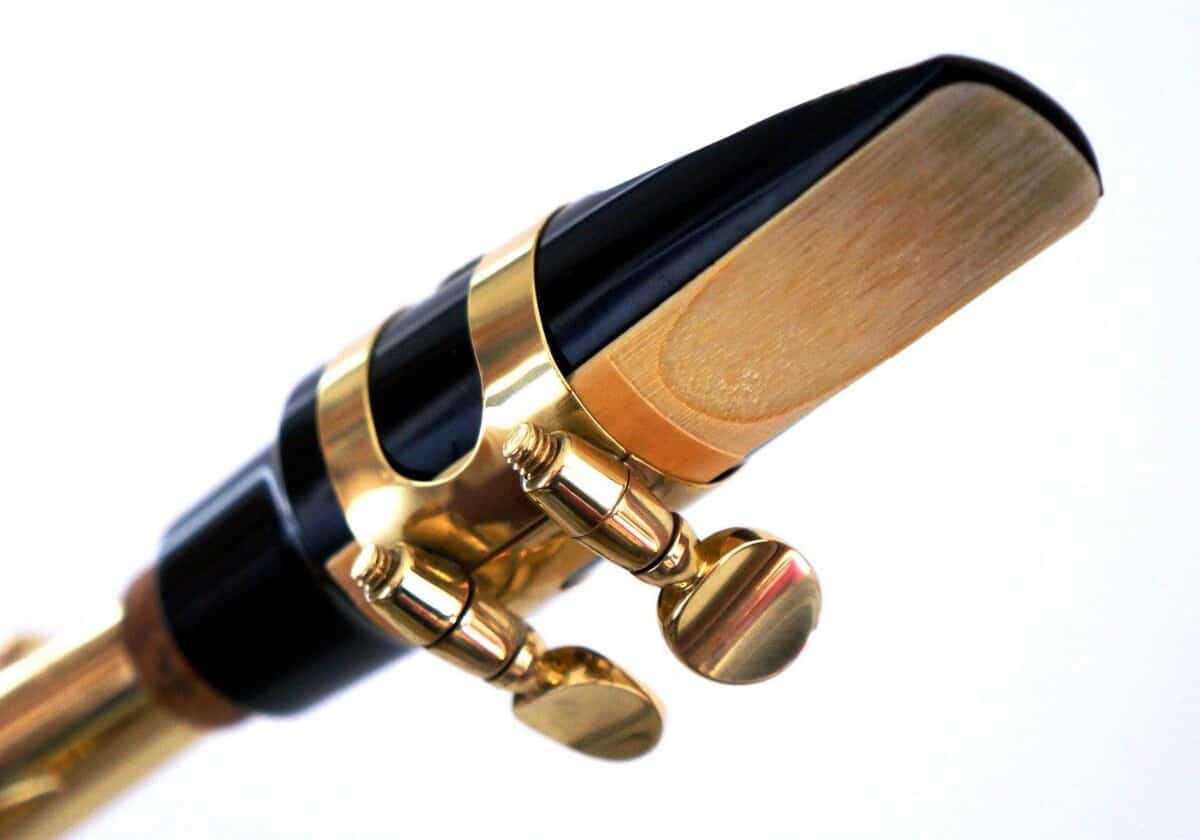
So, you should already have the ligature on the mouthpiece by the time you get to this step. You’ll need to keep the ligature relatively loose so that the reed fits underneath it. If the ligature is too small to allow the reed to fit underneath it, pull the ligature slightly closer to the tip of the mouthpiece to create more space. Then, just slide the thick end of the reed onto the flat portion of the mouthpiece under the ligature. You can see below how exactly this process is done:

Don’t tighten the ligature quite yet. You’ll need it to be loose so that you can tweak the position of the reed.
Adjusting the reed
After getting the reed onto the mouthpiece, the next step is to make sure that the reed is in just the right spot to produce a good sound. You should be able to adjust it relatively easily with your fingers by wiggling it into place.
Don’t be afraid of touching the reed; it can feel gross to touch something that’s been in your mouth, but you can always wash your hands afterward. Just be sure to keep your hands away from the tip. As mentioned previously, the tip is fragile and even the slightest touch could chip it. You can move the reed by its sides, center, or the thicker bottom part.
The basic goal of this part is to get the long sides of the reed (called the “rails”) to align with the edges of the flat portion of the mouthpiece. Otherwise air will leak out of the sides of the mouthpiece and you will be unable to produce a sound.

The tip of the reed should also be approximately aligned with the tip of the mouthpiece, though this issue warrants a more detailed discussion.
Placement of the tip of the reed
You will find all sorts of different advice regarding whether the tip of the reed and tip of the mouthpiece should be aligned or not. Some teachers have told me that the tip of the reed needs to be slightly lower than the tip of the mouthpiece (leaving a hair’s width of mouthpiece showing over the top), while others have told me that the tip of the reed needs to be slightly higher.
Any of these three are considered acceptable, though some teachers may have a preference for one over the others. In general, having the reed lower may make the reed easier to play on, while having it higher may allow for a more controlled sound. At the beginner level, however, you don’t need to worry too much about these distinctions.
I personally find best results from having the tip of the reed and tip of the mouthpiece as even as possible. This is something to experiment with, however, and what works for me may not be best for you. Once you begin playing your instrument, I recommend trying the different positionings of the reed shown above to get a better idea of what feels easiest for you.
Tightening the ligature
The last step of the process is to simply tighten the ligature. You want to be careful, however, that you do not tighten the ligature too much. In fact, it should ideally be only just tight enough to prevent the reed from moving around as you play, and no tighter.
The reason for this is that reeds tend to perform better when they are allowed to vibrate as much as possible. You therefore want to maximize the vibration of the reed for the best quality of sound, while still ensuring that the reed does not move out of place and allow air to escape from the edges of the mouthpiece (which will eliminate your sound entirely).
So, just tighten the screw(s) a little bit. The ligature can hold the reed in place while still being relatively loose, so there’s really no need to tighten it that much.
Conclusion
At this point, you should be able to put a reed on to a saxophone mouthpiece in a way that is correct and does not risk damaging the reed. If this is still relatively new to you, I recommend practicing this a few times to get the hang of it.
That being said, putting the reed on the saxophone is just one part of putting the saxophone together. If you need help putting the saxophone as a whole together, you can find a broader guide for that here.
In any case, this process should get easier as you practice it.